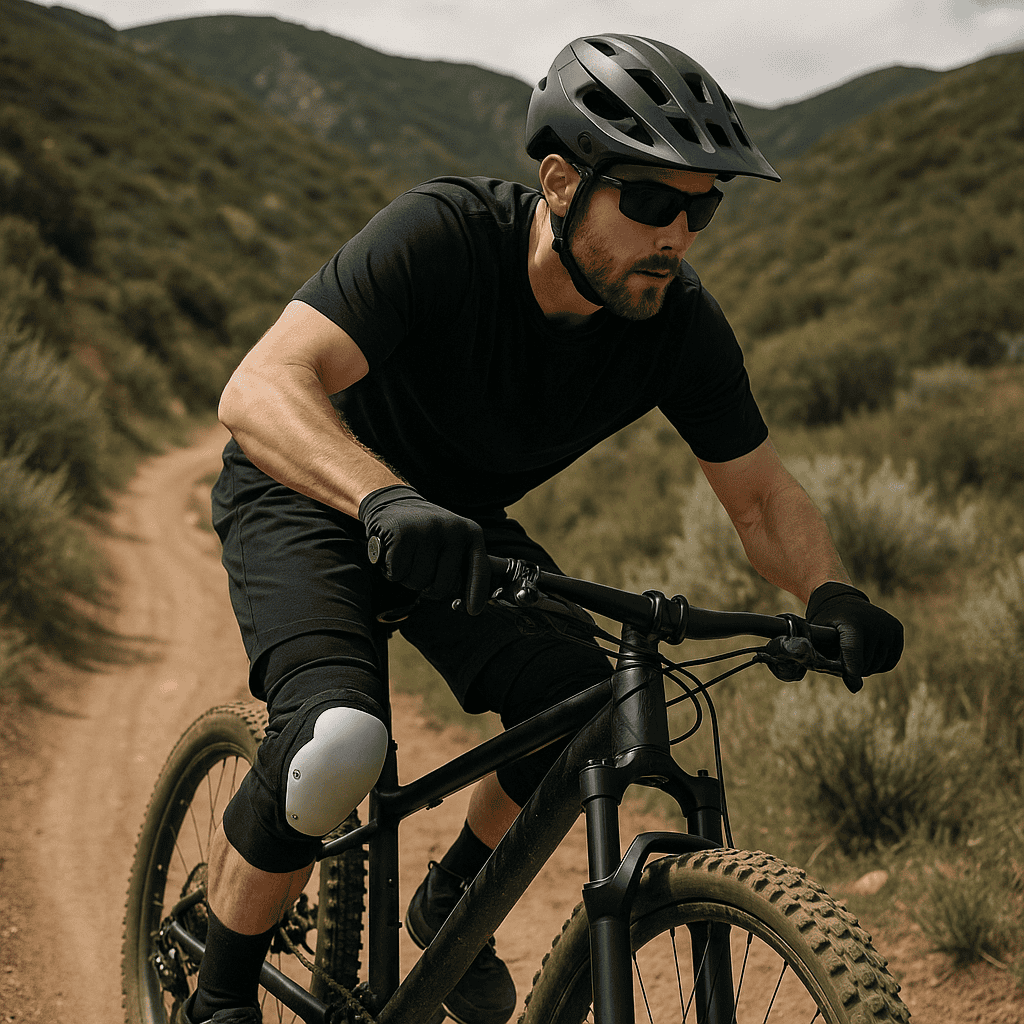
Why Knee Pads Matter for Mountain Biking
One of the most used bones and contact points is your knees.
You’ll notice that you may often strike rocks, roots, pedals, or the ground, and if you do, then you could have some issues without any knee pads. More severe injuries include the patella, the sides of the knee, and the upper shin, where pedal strikes and slide abrasions occur.
Sure, you can go a little while without knee pads as a beginner. But when you get into double-track trails, more hilly trails, more mountainous terrain, and take mountain biking more seriously, then you’re going to need to upgrade.
With effective MTB knee pads, impact is spread and absorbed, creating force elsewhere while adding abrasion resistance to reduce lacerations and bone bruising. It’s also a great addition to some of the best cold weather mountain biking gear.
How Knee Pads are An Unknown Essential
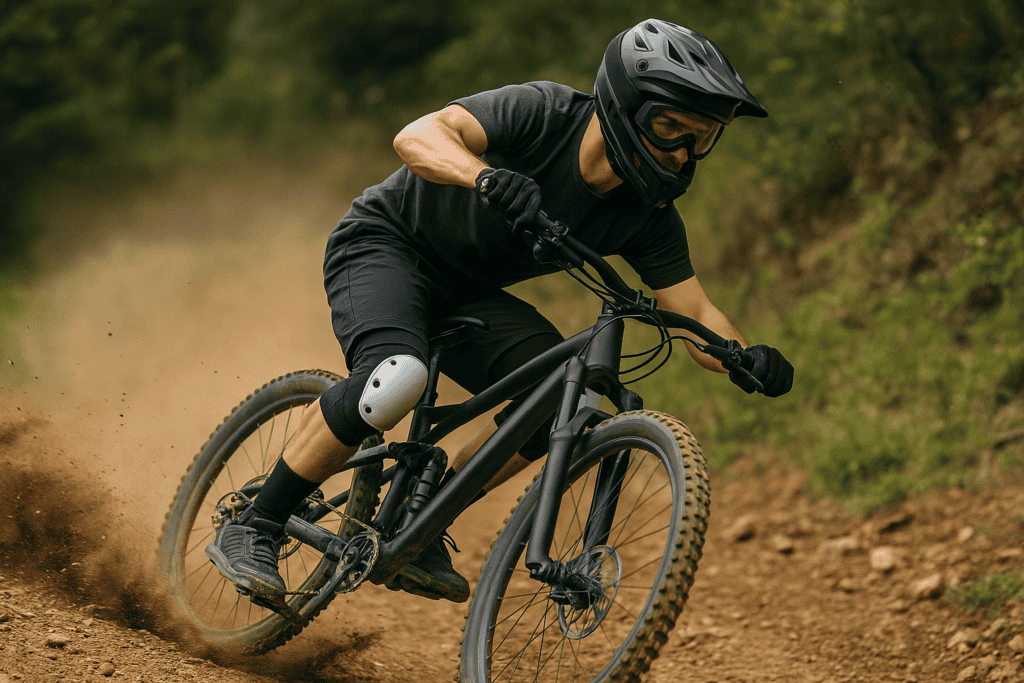
Knee pads are a surprising essential for downhill, enduro stages, bike parks, and technical trails. You could go without, but with being a faster rider and giving thought to exposure where a fall has serious consequences, such a hilly single-track or even a double-track.
They can be optional on mellow XC routes, easy fire roads, or hot recovery spins where risk is minimal, and pedal efficiency is the priority. If you are new to a trail, riding alone, or pushing skills, treat knee pads as an additional safety feature just like your helmet. I noticed the first time I headed out there that people used a variety of equipment, such as sleeved pants and full-body shirts; however, this right here will put you ahead of most riders.
Types of MTB Knee Pads & Potential Impacts
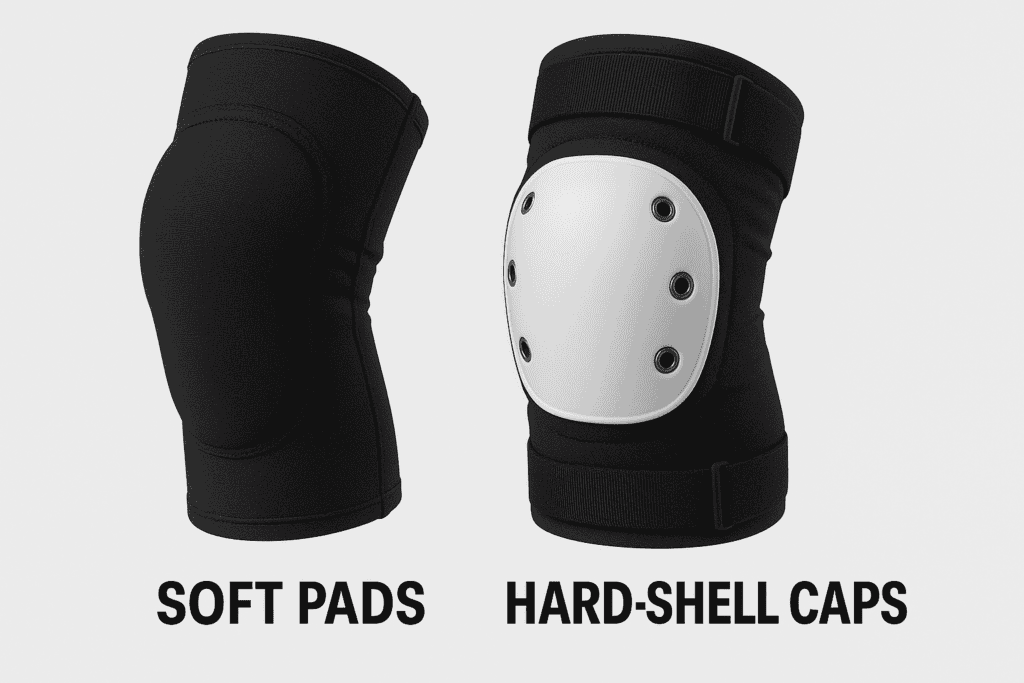
Soft Pads / Hard Shell Caps
Now you’re thinking about pads, the soft sleeve pads use elastic foams that are flexible for pedaling and hold strong under impact. And most importantly, when you use pads, they prioritize comfort, breathability of your legs, making them absolutely valuable to any ride. They don’t just value freedom of movement, and if you want a pad you can keep on for the entire ride.
So how can you tighten that up a little more? Add a hard shell, and they feature a rigid outer shell that slides on impact and resists punctures from sharp objects, making you feel almost invulnerable to damage, but still be careful as always.
They offer strong frontal protection and are popular for downhill, freeride, and dirt jump riding. The trade-off is increased bulk, less breathability, and potentially more interference with pedaling, so use them always at the right times.
Another option is a hybrid, which is somewhat absorbing and are smaller, yet is more comfortable. It’s a smart choice for any aggressive trail and enduro riders. Also consider knee-only pads cause they protect the patella and surrounding areas, keeping weight and heat down for pedaling.
Sleeve designs pull on like a sock for even pressure distribution and fewer hotspots, and they typically breathe better. Strap-on designs use hook-and-loop closures for easy on/off at the trailhead or mid-ride without removing shoes. If your fit is tricky or you want to enhance your tightness, and can solve slippage and comfort issues.
Level 1 vs Level 2
Level 1 pads allow a higher force on your pads than Level 2 but still meet a recognized safety threshold suitable for many trail scenarios. Level 2 pads offer greater impact protection, making them better for enduro, bike park, and downhill, where crash forces can be higher.
Impact Absorption V Pedal Comfort Tradeoffs
Higher-protection pads generally use thicker foams or larger shells, which can increase weight and reduce ventilation. Lightweight, pedal-friendly pads feel better during long climbs but may offer less protection in high-speed crashes. Match the protection level to your risk tolerance and terrain so you are protected without avoiding wearing the pads.
What do I buy for my MTB?
XC/Downcountry: lightweight, breathable
For XC and downcountry, choose minimalist pads with thin viscoelastic foam and high ventilation. Look for less visible sleeves that disappear under shorts and do not hinder your movement. Level 1 is usually sufficient, with focus on comfort and consistent wear.
Trail/All-Mountain: Balanced Protection
Trail and all-mountain riders should pick pads that blend pedal comfort with impact absorption. There’s more than one design, so decide what’s right for your price-point, make sure your pads are not excessively hot, and don’t harm your ride. Level 1 or light Level 2 options can strike the right balance for varied terrain.
Enduro: Easier Pedaling With Higher Protection
Enduro riding demands protective pads that you can pedal in for hours and still trust on timed stages. Look for CE Level 2 cores, secure grippers, and articulated shaping for efficient movement. Good ventilation, removable shells, and reinforced fabrics extend comfort through long days.
Downhill For Maximum Coverage
For downhill, freeride, and park laps, opt for robust pads with hard caps or dense hybrids and extended side coverage. CE Level 2 protection and abrasion-resistant panels help with repeated crashes and high-speed tumbles. Consider knee-shin guards if pedal strikes or wooden features are common.
For Street/Jumping
Dirt jump and street sessions benefit from hard caps that slide and resist repeated impacts. Focus on tight, non-slip fits and tough outer materials that can handle concrete or packed dirt. Breathability is less critical than secure coverage and durability for trick attempts.
Key Features to Compare
Fit and Articulation
Anatomical shaping and pre-curved designs follow the knee’s natural bend to reduce bunching and hotspots. Good articulation prevents pad migration during pedaling and on impacts, improving protection alignment. Try to find a fit that stays centered on the patella without squeezing the back of the knee.
Ventilation and Moisture Management
Perforations, mesh back panels, and moisture-wicking liners reduce heat build-up and sweat. Cooler pads are more likely to be worn consistently, which increases real-world protection. If you ride in hot climates, prioritize airflow to avoid pulling pads down mid-ride.
Sleeve length, grippers, straps, anti-slip silicone
Longer sleeves distribute pressure and resist rolling, while silicone grippers and elastic hems minimize slippage. Adjustable straps fine-tune tension and help with in-between sizing or asymmetric legs. Combine features based on your anatomy to keep pads stable over rough terrain and long climbs.
Coverage area (side pads, extended shin)
Side padding protects the medial and lateral knee from frame and ground impacts, which are common in low-sides. Extended shin protection guards against pedal bites and rock strikes on steep, rocky trails. Choose coverage that reflects your crash patterns and local terrain hazards.
Durability and abrasion zones
Reinforced outer fabrics and strategically placed abrasion panels extend lifespan significantly. Stitching quality and panel layout determine whether pads survive repeated slides and brush passes. If you ride rocky trails or park, prioritize durability even if it adds slight weight.
Weight and Bulk
Lighter pads improve pedaling efficiency and comfort but may compromise maximum impact performance. Bulkier pads can catch on pant legs or feel cumbersome on long rides, especially in heat. Balance weight against your protection needs and how often you will keep pads on while climbing.
Compatibility with pants, knee braces, and guards
Ensure pad thickness and cap shape fit comfortably under riding pants without catching. If you wear knee braces, look for low-bulk pads or brace-compatible designs that do not interfere. For knee-shin combos or combo armor, check overlap points to avoid gaps and chafing.
Sizing and Fit Guide
How to measure (thigh, knee, calf circumference)
Measure your thigh about 10–15 cm above the kneecap, your knee at the widest point, and your calf at the thickest area. Use a soft tape measure and keep it snug but not tight to simulate real wear. Record measurements for both legs, as slight differences can affect fit and slippage.
Size charts and in-between sizing tips
Compare your measurements to the brand’s size chart and prioritize knee and calf numbers for retention. If you are between sizes, consider your priorities: size down for better hold if the material is stretchy, or size up if you prefer less pressure and will use straps. When in doubt, test both sizes to confirm stability without constriction.
Men’s, women’s, and youth fit differences
Women’s and youth pads often feature narrower knee profiles, shorter sleeves, and adjusted calf tapers for better alignment. Men’s fits may accommodate larger thighs and longer limbs, which can change gripper placement and sleeve length. Choosing a gender- or age-specific model can reduce hotspots and improve pad centering.
Try-on checklist: slippage, pinch points, pedal stroke comfort
During a test, squat, lunge, and pedal on a trainer to check for pad creep and rotation. Assess pressure behind the knee and at the grippers; discomfort here will worsen on long rides. Ensure the pad stays centered over the patella through the full pedal stroke without rubbing the crank or catching fabric.
How to Wear and Prevent Slippage
Positioning the cap over the patella
Align the primary cap or foam directly over the kneecap so the impact zone is centered. Make sure side panels sit evenly on both sides of the joint for full coverage. Recheck alignment after a short ride, as initial movement can reveal fit issues.
When to do Under Socks or Pants
Wearing pads over thin knee-high socks can improve comfort and reduce skin irritation. Under pants, ensure fabric does not bunch under grippers and that articulation remains smooth. If wearing over pants, confirm the pad still grips securely and does not slide on slick fabrics.
Managing Long Climbs
For very long climbs, some riders slide their pads, and I’ve seen it on a small chance to their ankles or stash them on a pack to cool off. If you pedal in pads, choose breathable models and slightly loosen straps on climbs, then retighten before descents. Always reposition pads properly before technical sections to maintain protection.
Break-In Tips and Adjusting Straps/Grippers
Give new pads a few rides to break in foams and fabrics for a better conforming fit. Adjust straps in small increments to avoid over-tightening that can restrict blood flow or cause numbness. Keep grippers clean and dry, and consider a light alcohol wipe to restore tack if they accumulate sunscreen or dust.
Care, Maintenance, and Replacement
Washing and drying (hand/machine guidelines)
Follow the manufacturer’s care label, removing any impact inserts if required before washing. Use cold water, mild detergent, and gentle cycles or hand wash to protect foams and seams. Air dry flat away from direct heat, as high temperatures can degrade elastics and adhesives.
Odor control and storage
Rinse pads after sweaty rides and dry them promptly to minimize bacteria growth and odor. Occasional use of sport-specific antimicrobial washes can keep liners fresh without harsh chemicals. Store in a cool, dry place with inserts flat to maintain shape and performance.
Inspecting after crashes
After a crash, check for crushed foam, cracked caps, torn seams, and abraded panels. Make sure pads still sit correctly and do not rotate or sag more than before the impact. If structural elements are compromised, protection is reduced and replacement is advised.
When to replace (foam compression, torn fabric, loose grippers)
Replace pads when foam permanently compresses and no longer rebounds, reducing impact absorption. Significant fabric tears, delamination, or loose grippers that cause slippage are clear signs of end-of-life. Frequent riders should reassess annually, especially after multiple crashes or heavy park use.
Common Mistakes to Avoid
How You Can Choose Your Pads Incorrectly
When having oversized pads slide down and rotate, it exposes the knee at the worst moment. Smaller pads restrict blood flow, cause shifting and constriction, and can shift muscles due to tension. Accurate measurements and test pedaling help you avoid both extremes, which you can try out at a store like REI.
Over-tightening straps
Excessive strap tension can create numbness, hotspots, and premature fatigue on climbs. Over-tightening may also distort pad shape and reduce impact performance by misaligning the cap. Aim for snug, even pressure that keeps pads steady without discomfort.
Using DH pads for long pedal days
Heavy downhill pads can overheat and chafe on all-day pedals, leading riders to remove them and ride unprotected. Choose trail or enduro-grade options that you are willing to keep on throughout the ride. Wearing slightly lighter pads consistently often yields better real-world safety.
Ignoring CE ratings and coverage
Skipping CE ratings makes it hard to compare safety between models and levels. Check for Level 1 or Level 2 and verify coverage areas, including side pads and upper shin. A well-rated pad in the right zones provides more meaningful protection than generic foam.
Skipping ventilation needs for hot climates
Underestimating heat leads to discomfort and pad removal on the trail. Prioritize mesh panels, perforated foams, and breathable sleeves if you ride in warm weather. Good airflow keeps you wearing pads and therefore, protected when it matters.
Knee Pads vs Knee-Shin Guards
Pros and cons
Knee-only pads are lighter, cooler, and easier to pedal in, but they leave the shin vulnerable to pedal bites and rocks. Knee-shin guards add robust coverage and confidence for steep or technical terrain, at the cost of weight and heat. Your choice hinges on terrain, riding style, and tolerance for bulk.
Who should choose which
Trail and XC riders typically prefer knee-only pads for efficiency and comfort. Downhill, enduro on rocky tracks, dirt jumpers, and riders prone to pedal strikes benefit from knee-shin coverage. If you ride mixed terrain, consider a modular system or keep both types in your gear rotation.
Seasonal and Climate Considerations
Hot weather breathability
In hot conditions, prioritize pads with open meshes, perforated impact foams, and sweat-wicking liners. Lighter colors and quick-dry fabrics also help manage heat and moisture. Comfortable, breathable pads keep you protected because you are less likely to remove them.
Cold/wet weather layering and drying
For cold or wet rides, pair pads with thermal or water-resistant layers without over-compressing the sleeve. Choose materials that dry quickly post-ride to prevent mildew and odors. After muddy sessions, rinse promptly and air dry to preserve foams and elastics.
Final Thoughts
After writing the article myself, I found how important and how knee pads in my past couple of rides have changed the way I ride and have helped me be less careful riding and more at the same time.
I believe at any point, it’s worth picking up knee pads, and no matter the cost it will enhance your experience and meet more people with this equipment to help you go further where you’re at.

FAQs
Do I need knee pads for trail riding?
While not mandatory, knee pads are strongly recommended for trail riding due to unpredictable features and crashes. Lightweight, breathable models provide a good safety-to-comfort ratio for most riders. Wearing them consistently reduces injury risk without severely impacting pedaling.
Can I pedal long climbs with knee pads?
Yes, with the right pads that prioritize articulation and ventilation, long climbs are manageable. Soft or hybrid sleeves with breathable meshes reduce heat and chafing during sustained efforts. If overheating, slide pads down temporarily or loosen straps, then re-secure before descending.
What’s the difference between Level 1 and Level 2 protection?
Level 1 pads meet a baseline impact attenuation, allowing higher transmitted force than Level 2. Level 2 pads offer greater impact reduction, favored for high-speed and technical riding. Choose based on your terrain and risk tolerance, balancing protection with pedal comfort.
How tight should MTB knee pads fit?
Pads should be snug enough to resist slippage and rotation without restricting blood flow or causing numbness. You should be able to pedal, squat, and lunge without sharp pressure behind the knee. If pads slide down or twist, consider a different size or design with better grippers or straps.
How long do MTB knee pads last?
Lifespan depends on riding frequency, crashes, and care, with most pads lasting from one to several seasons. Frequent impacts, UV exposure, and washing can degrade foams and elastics over time. Replace when foam compresses, fabrics tear, or grippers lose effectiveness.
Are hard-shell pads safer than soft pads?
Hard-shell pads resist punctures and slide better on abrasive surfaces, which can reduce direct trauma. Soft viscoelastic pads can match or exceed impact absorption when CE-rated, while offering better pedal comfort. Safety depends on use case, rating, coverage, and fit rather than shell type alone.
What are the best pads for hot weather?
Pads with perforated viscoelastic foams, mesh-backed sleeves, and moisture-wicking liners perform best in heat. Low-bulk designs and secure grippers help maintain position when sweating. Prioritize ventilation so you keep pads on throughout the ride.
Can I machine wash MTB knee pads?
Most pads can be machine-washed on gentle, cold cycles with mild detergent after removing inserts if required. Place them in a laundry bag to protect seams and grippers, and avoid fabric softeners. Always air dry away from heat to preserve materials and adhesives.
Can skate/BMX pads work for MTB?
Skate and BMX pads can provide solid frontal and abrasion protection, especially hard-cap models. However, they may lack pedal-friendly articulation, breathability, and MTB-specific coverage zones. For regular MTB use, choose pads designed and rated for cycling impacts and ventilation.
Quick Buyer Checklist
Riding style and terrain
Match pad type to how and where you ride, from XC efficiency to DH durability. Technical, rocky terrain warrants higher coverage and stronger materials. Mellow trails and long climbs favor lightweight sleeves you will actually wear.
Level 1 or Level 2 based on risk. Level 2 is better for aggressive riding and parks, while Level 1 suits everyday trail use. A big piece of the ratings ensures consistent, test-based impact performance.
Fit and Slippage Test
Measure accurately and test pads with squats and pedaling to check for rotation and creep. Seek even pressure without hotspots behind the knee or on grippers. If pads move during motion, try another size or a different retention design.
Ventilation and Comfort
Inspect mesh panels, perforations, and liner materials for heat management. Comfortable pads stay on, improving real-world safety. If you ride in warm conditions, prioritize airflow and moisture control.
Coverage and Durability Zones
Look for side padding, extended shin options, and reinforced abrasion panels where you tend to crash. Durable stitching and fabrics resist tearing and extend product life. Proper coverage reduces common injuries from slides and pedal strikes.
Weight vs Protection Balance
Heavier pads protect more but can hinder long pedaling and increase heat. Choose the lightest pad that meets your safety needs for your terrain. A balanced approach maximizes both confidence and comfort.
Care and Replacement Costs
Consider ease of washing, drying time, and the availability of replacement inserts. Pads that are simple to maintain are more likely to be kept fresh and functional. Budget for replacement when foams pack out or fabrics wear.